HOWTO: get morphometrical statistics in Freesurfer with a new atlas
TLDR
If you already know Freesurfer and its workings, here's the TLDR for you (extracted from the PALS_B12 atlas page in the freesurfer wiki):
mri_surf2surf --srcsubject fsaverage --trgsubject subjid --hemi lh \
    --sval-annot $SUBJECTS_DIR/fsaverage/label/lh.YOURATLAS.annot \
    --tval       $SUBJECTS_DIR/subjid/label/lh.YOURATLAS.annot
mri_surf2surf --srcsubject fsaverage --trgsubject subjid --hemi rh \
    --sval-annot $SUBJECTS_DIR/fsaverage/label/rh.YOURATLAS.annot \
    --tval       $SUBJECTS_DIR/subjid/label/rh.YOURATLAS.annot
You might want to enable the --cortex argument so that the {hemi}.cortex.label files are used to avoid including the medial wall.
Then
mris_anatomical_stats -a subjid/label/lh.YOURATLAS.annot -f subjid/stats/lh.YOURATLAS.stats -b subjid lh
mris_anatomical_stats -a subjid/label/rh.YOURATLAS.annot -f subjid/stats/lh.YOURATLAS.stats -b subjid rh
And finally
aparcstats2table --parc YOURATLAS --subjectsfile subject_list.txt --hemi lh --meas thickness --tablefile lh.aparc_stats.txt
aparcstats2table --parc YOURATLAS --subjectsfile subject_list.txt --hemi rh --meas thickness --tablefile rh.aparc_stats.txt
I prefer to use the --subjectsfile argument, but there are other ways of specifying these.
Also, notice I specified "thickness" in the --meas argument, but there are other measures (area, volume, thicknessstd, meancurv, gauscurv, foldind, curvind).
It's also a good idea to get acquainted with the "mri_surf2surf", "mris_anatomical_stats", and "aparcstats2table".
Example
This has been tested in Freesurfer version 7.3.2:
freesurfer-linux-ubuntu20_x86_64-7.3.2-20220804-6354275
All the info above can be found in the "recon-all" wiki. You might want to check the source code for "surf2surf" where all the arguments are explained (some of which are not described in the wiki).
Below, I will go through each step of the process.
Step 1: Run the recon-all routine
This is a mandatory first step, which I assume you already did for your subjects of interest. The base command looks like this:
recon-all -i T1.nii -subject subjid -sd $SUBJECTS_DIR -all
You can (and should) read the recon-all wiki to see what other arguments you can use.
Step 2: Download the atlas
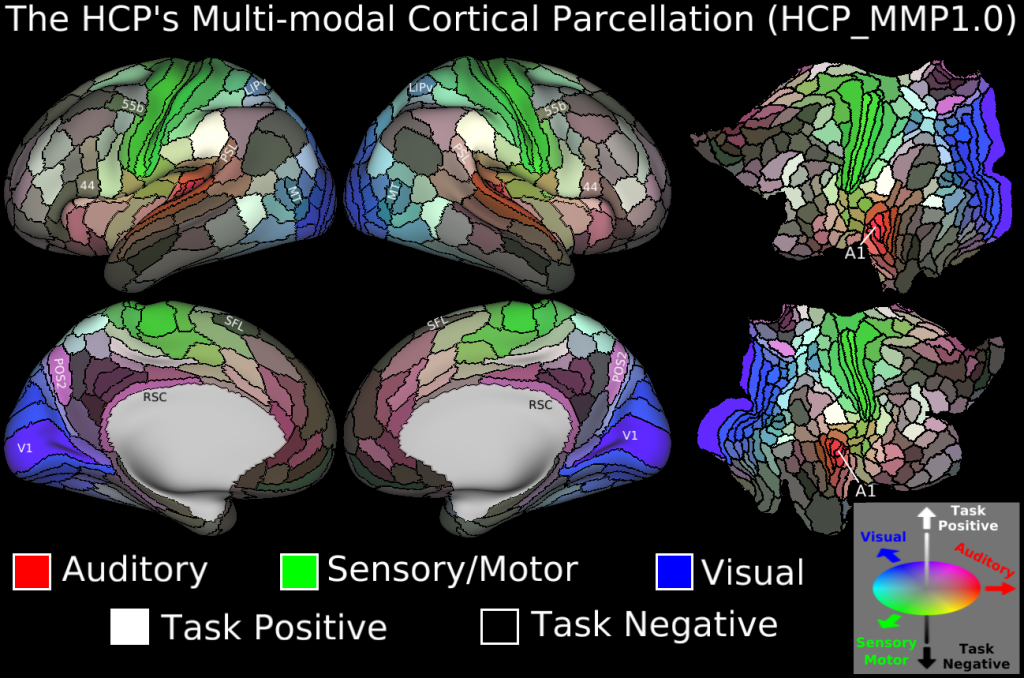
We will download the HCP-MMP 1.0 atlas in the fsaverage space.
This is a multimodal parcellation atlas, developed by Glasser et al. (2016)[1].
It comprises 360 regions over both hemispheres.
It looks like this:
Get it here.
Or, download it with, for example, wget or your preferred download tool:
wget https://figshare.com/ndownloader/articles/3498446/versions/2 -O HCP-MMP1_0_projected_on_fsaverage.zip
unzip HCP-MMP1_0_projected_on_fsaverage.zip
This will get you two files: lh.HCP-MMP1.annot and rh.HCP-MMP1.annot.
These are projected on the fsaverage space, so move them to the fsaverage directory.
For example, you can do this with mv:
mv lh.HCP-MMP1.annot $SUBJECTS_DIR/fsaverage/label/lh.HCP-MMP1.annot
mv rh.HCP-MMP1.annot $SUBJECTS_DIR/fsaverage/label/rh.HCP-MMP1.annot
Step 3: Project the atlas to the subject's brain
For the standard atlases included in recon-all, mris_ca_label is used to obtain subject-space labels.
mris_ca_label is based on a probabilistic model[2] based on the Iterated Conditional Modes (ICM), which is trained with mris_ca_train.
Since we don't have the train dataset for the HCP-MMP atlas, we will project the atlas to the subject's brain instead using mri_surf2surf.
mri_surf2surf is a tool for projecting surface-based data to a different surface.
In our case, we will simply project the labels.
mri_surf2surf --srcsubject fsaverage --trgsubject subjid --hemi lh \
    --sval-annot $SUBJECTS_DIR/fsaverage/label/lh.HCP-MMP1.annot \
    --tval       $SUBJECTS_DIR/subjid/label/lh.HCP-MMP1.annot
mri_surf2surf --srcsubject fsaverage --trgsubject subjid --hemi rh \
    --sval-annot $SUBJECTS_DIR/fsaverage/label/rh.HCP-MMP1.annot \
    --tval       $SUBJECTS_DIR/subjid/label/rh.HCP-MMP1.annot
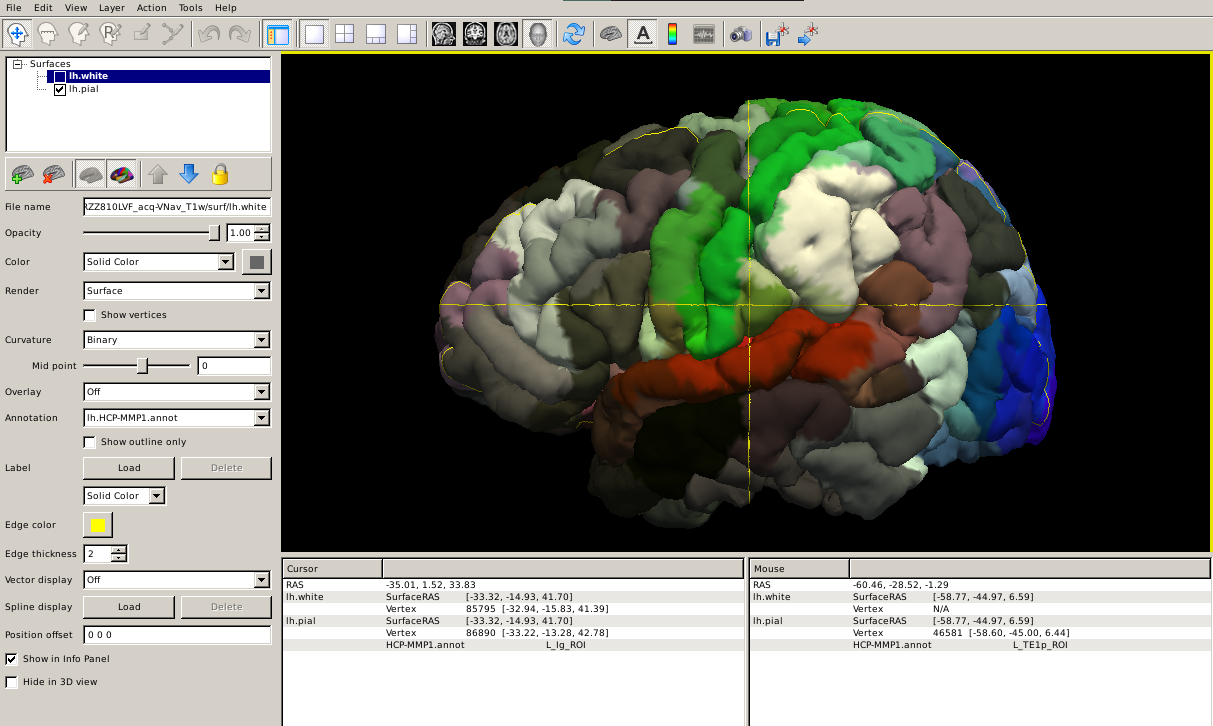
Here's how it looks like projected to the subject's brain pial surface:
Step 4: Calculate the atlas statistics
We will use the mris_anatomical_stats command to calculate the atlas statistics for one individual subject.
mris_anatomical_stats -th3 -mgz -cortex $SUBJECTS_DIR/subjid/label/lh.cortex.label -f $SUBJECTS_DIR/subjid/stats/lh.HCP-MMP1.stats -b -a $SUBJECTS_DIR/subjid/label/lh.HCP-MMP1.annot subjid lh white
mris_anatomical_stats -th3 -mgz -cortex $SUBJECTS_DIR/subjid/label/rh.cortex.label -f $SUBJECTS_DIR/subjid/stats/rh.HCP-MMP1.stats -b -a $SUBJECTS_DIR/subjid/label/rh.HCP-MMP1.annot subjid rh white
The -th3 option is used to "Compute vertex-wise volume by dividing each obliquely truncated trilateral pyramid into three tetrahedra".
The surface option is set to white, i.e., the innermost surface of the cortex adjoining white-matter.
These are the defaults in the recon-all routine.
Step 5: Gather the atlas statistics for all subjects
After running the above commands for each subject (I recommend you to write a bash script for that), we can gather the atlas statistics for all subjects.
aparcstats2table --parc HCP-MMP1 --subjectsfile subject_list.txt --hemi lh --meas thickness --tablefile lh.HCP-MMP1_stats.txt
aparcstats2table --parc HCP-MMP1 --subjectsfile subject_list.txt --hemi rh --meas thickness --tablefile rh.HCP-MMP1_stats.txt
Conclusion
This is a simple example of how to obtain statistics for a new atlas in a group of subjects. There are some other ways to do this, but this is a good starting point for you to get familiarized with the commands.
Glasser, et al. (2016). A multi-modal parcellation of human cerebral cortex. Nature. doi:10.1038/nature18933 ↩︎
Fischl, et al. (2004). Automatically Parcellating the Human Cerebral Cortex. Cerebral Cortex. doi:10.1093/cercor/bhg087 ↩︎